In Need of Updates

I’m still around, doing tech things, but been busy with work and family.

Posting this quick update as I’ve made a theme change (my old theme was no longer supported and breaking) but it’s not to my liking yet. I’ll fix it when I have a little more down time.

I’ve also moved my wordpress to a hosting provider as I’ve sadly given up running my own co-located hardware. The email world finally bullied me out, a story for another time. This also means I’m finding broken links in the site that were referencing old static content outside wordpress that I need to go back through and recover. Another task on the list.

Additionally, I’ve moved most of my activity off Twitter, and to the Mastodon Federation. You can find me at DCaf@infosec.exchange https://infosec.exchange/@dcaf.

Cheers,
David

Posted in Lost And Found | Leave a comment

Blue Teams Next Tool: Social Engineering (Psychology and Sociology at Work) – References

This weekend I had the privilege to present at bsidesdc.org on the subject of Social Engineering techniques for use in driving positive security outcomes.  At the end of the presentation there were several great questions and a slide of reference materials I’ve studied related to the concepts I was presenting in the class.  Though I’m still settling back down after the conference, I did want to post the final slide from my deck (and my comments on the references) for others to follow up on if interested.  You can find the recording of the presentation and Question/Answer section here.  They were great questions which I think really helped add to the topic.

So here is the slide and my comments on the references (links to PDF version):

For the first two book references I called out particular chapters I thought were especially relevant to “Blue Team” security influencing.  But, both books are a great read in whole.

  • The Art of Deception
    • This is a great collection of stories style book regarding Social Engineering.  Provides an relatively easy read or less technical read that provides real world examples that then walks through the techniques and tricks used.
  • Social Engineering: The Art of Human Hacking
    • WARNING: A word about this Author.  After publishing this article information came out that Hadnagy behaved inappropriately and was banned from DefCon.  These skills should be used for good, not abuse.  If you do purchases this book, please find it used in your local used bookstore (plus you are supporting your local used bookstore!)
    • I would consider this a much more technical book, covers many of the same Psychology principles I discussed in great detail.  Additionally, it covers some very advanced techniques like recognizing micro-expressions that could also be potentially helpful to a Blue Team trying to read their audience.
    • There is a newer edition “Social Engineering: The Science of Human Hacking“, but I have not read that edition yet.
  • Quite: The Power of introverts in a World that Can’t Stop Talking
    • I read this primarily because of my interest in better understanding my own introverted ways originally.  I actually found that the discussion around the different ways introverts and extroverts process information, the ways they interact with individuals, and how they engage very helpful in understanding my own interactions with other introverts and extroverts.
  • Communication Theory – CMC in ODR
    • Bill Warters (Who I borrowed his great diagram of Communication Modeling from) has a great break down of commutation modeling process and examples.  This is a free online learning module of his.
  • Jek Hyde @HydeNS33K
    • Jek does a lot of great walk throughs of her on-site pen-testing (Social Engineering Engagements).  Well worth following here to see many of these techniques in practice.
  • Social Engineering for the Blue Team
    • Timothy De Block does a different talk on the same subject.  Great discussion on presentation and perceptions.
Posted in David, Security, Technology | Leave a comment

Taking a BIG leap with two speaking engagements.

I have two speaking engagements lined up over the next two months that I’m very excited about (with a drop of stage fright).  Both are on topics I am passionate about and feel need a lot more thought in the information security world: Human Interaction with Technology, and Psychological and Sociological aspects of Information Security.

The first talk I’m giving Sept. 28th is at a new technology conference in Harrisonburg, VA called Valley TechCon.  My talk is titled “Driving Security Through Technology”, but as a small hint, I focus a lot on the human element of technology.

The second talk I’m giving is Oct 26th at BSidesDC Security Conference in Washington, DC.  This is a great local security con focused on providing information security knowledge to all that want to learn.  It’s also one of the largest of the BSides Security conferences in the world.  My talk is titled “Blue Teams next tool: Social Engineering (Psychology and Sociology at Work).  Again, it’s a talk that focus a lot on the human interaction side of information security.

I’ve always had a great interest in how we, as individuals and societies, interact with technology.  Now I’m hoping to fan the flames of others interest in looking beyond just the technological answers to cyber security.

Posted in David, Security, Technology | Leave a comment

Building a Pen Testing Laptop from Scratch ( WCTF / CTF Laptop ) part 2

With all the hardware working from Part 1, it’s time to move onto getting all the software in place.  There were plenty of references to work from, and based the on the recommendations of Wireless Village to bring Pentoo Linux for the WCTF, that’s where I started.  Here are some lists that I worked from:

This is where I started just going through the list of packages and tried a dnf install.  Many of these are standard Linux packages installed by default, a lot of them are also included as part of the base Fedora distribution.  But, there are several that needs supplemental repo’s added to the dnf package system to make install (and upgrades/maintenance later) easier.  I didn’t install everything, but I tried to make sure I covered many of the big ones, as well as some others I had seen in tutorials.  As I get more time with the laptop, and other CTF/WCTF, I’ll be able to fine tune the install.

Supplemental Software Repositories

The following are the collection of external repos I’ve added to the base distribution to support the additional tools needed.

Fedora 27 openh264 (From Cisco)

This is really about just enabling the repo which is installed by default but disabled.  Some CTF may have audio coding/decoding requirements and this adds to your options.

sudo dnf config-manager --set-enabled fedora-cisco-openh264

RPM Fusion for Fedora 27 – Free

RPM Fusion provides a large collection of additional packages from several sources that the core Fedora team does not wish to provide in core Fedora.  It will also provide a lot of dependencies for packages from other repos.  Updates are not as guaranteed as the core Fedora repo, but most packagers are pretty good at keep them up2date.

The Free repo covers fully open-sourced packages that Fedora was unable to make part of the base distro for various reasons.

sudo dnf install https://download1.rpmfusion.org/free/fedora/rpmfusion-free-release-$(rpm -E %fedora).noarch.rpm

RPM Fusion for Fedora 27 – Nonfree

These are restrictive open-source or not-for-commercial use licensed packages.  If this is for personal use you should be fine, but if you mix work with pleasure, be warned, check the individual packages licenses before use.

sudo dnf install https://download1.rpmfusion.org/nonfree/fedora/rpmfusion-nonfree-release-$(rpm -E %fedora).noarch.rpm

CERT Forensics Tools Repository

Linux Forensics Tools Repository – LiFTeR is a gold mine for CTF based tools for forensics and similar operations.  You will want rpmfusion installed to help support some of these packages.

First I suggest adding the CERT gpg key to dnf to verify packages:

sudo rpm --import https://forensics.cert.org/forensics.asc

Then you can install the repo rpm.

sudo dnf install https://forensics.cert.org/cert-forensics-tools-release-27.rpm

Atomic Corp Repo

Atomic corp are the backers of OSSEC OpenSource HIDs solution, but they have a collection of security tools to supplement the above repos.  Tools like dirb.

sudo rpm -ivh http://www6.atomicorp.com/channels/atomic/fedora/27/x86_64/RPMS/atomic-release-1.0-21.fc27.art.noarch.rpm

Metasploit

It goes with out saying you’ll want to have Metasploit at your disposal, it’s a foundation tool that will help in your early offensive operations.  There are two versions that Rapid7 provides: the free Open Source Metasploit Framework and the paid Commercial Support Metasploit Pro.  The following instructions are for the free Open Source version, it will suffice to get you started, and provides opportunities to learn.

Unfortunately the install process is not a clean dnf focused procedure, they supply an install script that hides some of the complexity, but I choose to figure out how to get it working with out their install script and just add it to my dnf repo collection.  Again rpmfusion above will help with dependencies.

First thing is we need to get the Rapid7 GPG key.  That can be found in their installer script at the top here.

curl https://raw.githubusercontent.com/rapid7/metasploit-omnibus/master/config/templates/metasploit-framework-wrappers/msfupdate.erb 2>/dev/null | sed -e '1,/EOF/d' -e '/EOF/,$d' > metasploit.asc

We then need to add it to our rpm key signing store:

rpm --import metasploit.asc

Now we can manually add the Metasploit nightly rpm repo to dnf, and rpm install signatures should be happily verified going forward.

sudo dnf config-manager --add-repo https://rpm.metasploit.com/

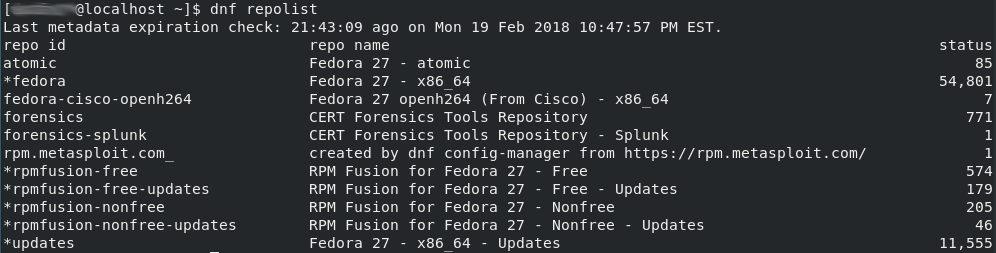
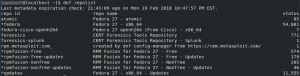
You can run the following command to confirm the repos are installed and ready to go (you may be accessed to accept several Fedora GPG keys being imported from the local installs)

dnf repolist

You should see something like this:

Packages Installed

With all the above in place there are two obvious installs you’ll want to do.  The full LiFTeR suite of tools and MetaSploit (warning this is about 3GB of software about to be installed, it’s a LOT of tools):

sudo dnf install CERT-Forensics-Tools metasploit-framework

Besides Metasploit (Exploitation/Pen-testing tool) your going to get Autoposy/SleuthKit (Forensics tool kit), Volatility (Memory Forensics), Silk (Packet analysis suite), Snort (IPS and packet analysis), nmap (Network Mapping and recon), Wireshark (Packet Analysis), and a huge host of other tools and supporting libraries.

Next up are a collection of individual tools that are also included in Pentoo, but the above did not install.

First up is a collection of assorted tools that deal with a range of WCTF/CTF exercises including password cracking, binary/code analysis, network analysis, network recon, exploit development, and more provided by Fedora.

sudo dnf install aircrack-ng scapy masscan zmap kismet kismet-plugins kismon gdb strace nacl-binutils nacl-arm-binutils examiner upx pcsc-lite-ccid chntpw libykneomgr libu2f-host mhash ophcrack chntpw libykneomgr libu2f-host mhash john ophcrack xorsearch crack sucrack ncrack ophcrack aircrack-ng pdfcrack cowpatty hydra medusa airsnort weplab tor flawfinder sage reaver urh hackrf hackrf-static cracklib-python perl-Crypt-Cracklib nikto dirb unicornscan net-snmp net-snmp-utils net-snmp-python net-snmp-perl net-snmp-gui skipfish

The following are more standard Linux tools, but very helpful in WCTF/CTF to handle audio/video analysis/manipulation, picture analysis/manipulation, coding, and quick network controls.

sudo dnf install vim-enhanced gstreamer1-plugin-openh264 mozilla-openh264 vlc python-vlc npapi-vlc dkms audacity ffmpeg firewall-applet system-config-firewall gimp nasm

Software Manually Installed

There were three packages I wanted to work with, but could not find good pre-built rpms of: hashcat, SANS SIFT

SANS SIFT

This can be gotten via VM, ISO, or installed locally.  In truth, it duplicates a lot of the tools already installed above.  I started down this route, then realized I would probably want to stick to the previous rpm route.  You can find the different install instructions here.

hashcat

This is a classic password cracker that supports a world of different CPU/GPU acceleration options.  I’m somewhat limited given I’m running this on a laptop, but still an important tool to have at hand.  Need to link it into some cloud based compute resources…

For install, it’s the classic download, verify, copy.

First lets make an area to handle non-normal apps (feel free to change this to your liking).

cd ~; mkdir Apps; cd Apps

Then retrieve the hashcat public key

gpg --keyserver keyserver.ubuntu.com --recv 8A16544F

Next download their pgp signing key

curl --output hashcat-4.0.1.7z.asc https://hashcat.net/files/hashcat-4.0.1.7z.asc

Then download their binary

curl --output hashcat-4.0.1.7z https://hashcat.net/files/hashcat-4.0.1.7z

Then verify signature

gpg --verify hashcat-4.0.1.7z.asc hashcat-4.0.1.7z

Then we can expand it and then install it.

7za x hashcat-4.0.1.7z
cd hashcat-4.0.1/
sudo cp hashcat64.bin /usr/local/bin/hashcat

And now it’s ready and in our path.  Downside is that we have to remember to manually check for updates occasionally.


Now onto WEP/WPA2 Cracking!

In part 3 of course.  Yeah, I know, it’s a tease, but want to get this software install bit out there, while I write up what I learned about WEP/WPA2 hacking.  I’ll cover basics like packet captures, packet injections (to force handshakes), and brute force pass-phrase recovery.

Posted in Hobbies, Linux, Security, Technology | Tagged , , , | 3 Comments

Building a Pen Testing Laptop from Scratch ( WCTF / CTF Laptop ) part 1

Last month for Shmoocon I decided I wanted to expand my skills a bit and take a shot at something I hadn’t really done much of in my InfoSec career lately, not since way back in the WEP and Linux Zaurus technology years.  Wireless hacking, i.e. a Wireless Capture The Flag event.

I’ve done some appsec testing, network pen testing, and similar in the past, but more side of desk to my core roles.  I haven’t played much in the wireless world, even after getting my Technicians class radio license last year (also at Shmoocon, baby steps I guess), so made the choice to learn as much as I could in my few days at the conference from their WCTF event put on by the good folks at Wireless Village.

These pages will describe what I’ve learned.  Order is hardware discussion then software discussion.  There will be references to some of the software tools in the hardware section, but don’t fear, all will be made clear in the end if you were like me and new to the subject.  Any software/terms mentioned early on aren’t critical, just for future reference as you manage to read through this page.

My Fedora WCTF Laptop

The WCTF Laptop hardware

The laptop: Dell Latitude 7370 with Fedora 27

To start I needed a laptop.  I have my personal Macbook Pro 13″ and an old Dell Vostro, but I didn’t want to deal with the silliness that MacOS presents to non-Mac’y things, and the Vostro is an ancient heavy 15″ stuck in the 32bit world.  I wanted something reasonably small, good battery life, great high-res screen and both USB-C and USB 3.0 ports to support a wide range of addons (like the wireless card I’ll talk about later).  I was targetting something that could handle four threads with no problem and at least have 16GB of ram and 256GB of SSD storage.  Also, needed to fully support Linux, and for well under $1K since I already had a perfectly fine daily laptop in the Macbook Pro.

The above quickly relegated me to the refurbished or used world.  Doing some searches I eventually found the Dell Latitude 7370 series.  This met all my requirements: ~2.5lbs weight, Intel M7 CPU, 16GB Ram, 256GB of Storage, QHD+ 3200×1800 13.3″ Touch Screen, WiFi AC, BT, USB-C and USB 3.0 ports.  And reports from the web said Linux installed fine on it.  Final key point, you can find these laptops (depending on exact spec) ranging from $500-800 refurbished, and often with a 3 year Dell hardware warranty included.  I managed to get mine on-sale at Newegg.com for a hair over $700 fully loaded about a week before Shmoocon.

Though the laptop came with Windows 10 Pro installed, I shrank the partition down and installed a dual boot with Fedora 27 (here is a straight forward write up).  I did a UEFI install of Fedora so that I could leave EFI Secure Boot enabled.  That caused some headaches (I mean learning opportunities) later when I was dealing with kernel modules for my new USB wireless card, but my goal was not to compromise host os security if at all possible.  I have kept the dnf security update process intact, I run SELinux enforcing, secure boot enforcing, encrypted partitions, and firewall, at all times.  Though there is always some level of “trust” that must be placed in Open Source software providers, I also make sure my dnf system has current keys and verifies software signatures regardless of providers.  So far there are only three software components that aren’t handled via dnf, which I’ll go into later.  I also made sure to create a new user and make them an “Administrator”, which is separate from the all powerful root user.

Hardware wise, almost everything works, and everything I needed did.  The only items I have not gotten to work in Linux is the fingerprint scanner, the WWAN, and the ID card reader.  And really, I just haven’t tried, maybe in Part 3?  There were only tow key changes I made to the standard Fedora install to make the hardware more effective.

First, was to add more scaling options to the monitor framebuffer.  Under “Settings -> Devices -> Display” by default you only have a couple of choices for scaling.  100% and 200% just weren’t right for me, needed something in between that didn’t punish my eyes but still took advantage of that lovely high resolution.  With the following command at the command line:

gsettings set org.gnome.mutter experimental-features "['scale-monitor-framebuffer']"

I was able to add additional choices, and found that 175% was the perfect scale for my vision.

Second was to add a gnome shell extension called “Block Caribou”.  This shell extension stops the virtual keyboard from popping up on the screen if you happen to use the touch screen.   Between accidently tapping the screen, and just trying it out, I don’t need another keyboard popping up and getting in the way of doing work.  Easier to keep it off using the shell extension.  You should be able to find it in the Fedora software shop under “add-ons -> shell extension”.  Ctrl-F to search for Caribou.

The WiFi: ALFA AWUS036AC 802.11AC 2.4/5Ghz

Though the Dell came with a perfectly good Intel 8260 802.11AC wireless network card, I wanted to have one that I believed had better support in the aircrack-ng community of tools and with solid monitor capability.  Also would like to stay on-net while learning my WCTF skills (access to online documentation and all).  Did some research and decided Alfa seemed to be making a large range of well supported USB adapters and that the AWUS036AC had driver support covering both 2.4 and 5Ghz networks in up-to the AC protocols.  What I didn’t learn until after my purchase and one day before Shmoocon, is that the support was “experimental” and limited.  But, in the end I was able to get it to work effectively for at least the basic skills I mastered.  Here is how:

Driver install:

This is the part I learned before Shmoocon.  There was no built-in driver for my Alfa card.  This I expected, so had already found the supported source code for the 8812au driver needed for this wireless card’s chip and aircrack-ng.  Install could be handled in two ways, “dkms” or manual “make” commands.  I originally went with dkms thinking it would make kernel upgrades easier, I was wrong.  Never cleanly integrated with Fedora kernel upgrades and with the need to sign drivers (details in a bit) I was stuck doing a lot of manual clean up and re-install work for the driver on each kernel update.  Stick with “make”, it’s easier.  Also, stick with the 5.1.5 branch for now, the 5.2.9 branch has issues.  This is what I did:

  1. Download the driver, you can either download a zip archive or use git to pull a copy from the repo (I’m showing the .zip method below)
  2. Make sure your user is setup as an administrator with access to sudo and wheel
    Hopefully you chose your primary Fedora user as an administrator when setting up, if not you may want to read up on User/Group Management in Fedora
  3. Make sure you have the latest source/headers for your kernel and build tools so you can build your kernel module against it.
    sudo dnf install kernel-devel kernel-headers dkms make gcc gcc-gdb-plugin libgcc glibc-headers glibc-devel
  4. Create a new directory using root/sudo in /usr/src called /usr/src/rtl8812au-5.1.5
    sudo mkdir /usr/src/rtl8812au-5.1.5
  5. Change permissions on it so that your regular user can handle the compiling part (save root permissions for when you really need them)
    sudo chown root:wheel /usr/src/rtl8812au-5.1.5
    sudo chmod g+w /usr/src/rtl8812au-5.1.5
  6. Copy the downloaded source code and tree into the directory as your normal user
    sudo cp rtl8812au-5.1.5.zip /usr/src/.
    cd /usr/src/
    unzip rtl8812au-5.1.5.zip
  7. Build the source tree with make
    cd rtl8812au-5.1.5
    make
  8. Install the source tree with make (need root again)
    sudo make install

Now if you aren’t using secure boot, you are good to go with the driver working.  If you are using secure boot then you have to sign these drivers with a EFI recognized certificate or the kernel will refuse to load them.  That’s a good thing, throws more hoops that malware would need to jump through to gain persistent access on your system.  But it means a little upfront work on your part, and one additional command line entry step each time you install/update the driver in the future.  I think it’s well worth the effort and learning experience, the following is based on:

  1. First you need to create a certificate pair for signing (keep these certs protected, and replace “mycert” with something relevant to you)
    sudo dnf install mokutil
    mkdir .mokcerts
    chmod o-rwx .mokcerts
    cd .mokcerts
    openssl req -new -x509 -newkey rsa:2048 -keyout MOKmycert.priv -outform DER -out MOKmycert.der -nodes -days 36500 -subj "/CN=mycert/"
  2. Then you need sign your new drivers
    sudo /usr/src/kernels/4.14.16-300.fc27.x86_64/scripts/sign-file sha256 ./MOKmycert.priv ./MOKmycert.der /lib/modules/4.14.16-300.fc27.x86_64/kernel/drivers/net/wireless/8812au.ko
  3. Now you’ll need to request adding your cert as a trusted cert in EFI
    sudo mokutil --import MOKmycert.der
    (remember the password you set, you will need it later!)
  4. Still not done, now you need to reboot and install and confirm your cert to EFI
    On reboot the system should automatically detect the key addition request above and boot into the MOK key management system.  Here you will be requested to provide passwords and accept the addition of your key.  Unfortunately this may vary some depending on bios version and hardware so I can’t provide a lot of guidance here, just read carefully and follow the prompts.  Also, REMEMBER YOUR PASSWORDS!
  5. Now when you finish rebooting your signed kernel driver for your Alfa should load fine.

Unfortunately on every new kernel you will need to rebuild the module, install it, and sign it.  That consists of the following commands (and making sure you are in the correct directories you used in the above steps):

  1. In the /usr/src/rtl8812au-5.1.5 directory:
    make clean
    make
    sudo make install
  2. In your .mokcerts directory (making sure you are referencing the new kernel directory):
    sudo /usr/src/kernels/`uname -r`/scripts/sign-file sha256 ./MOKmycert.priv ./MOKmycert.der /lib/modules/`uname -r`/kernel/drivers/net/wireless/8812au.ko

The uname -r will insert the current kernel into the command, if you updated your kernel but hadn’t rebooted yet, it will be the wrong kernel version as you are still running the old kernel. You’ll need to manually figure out the kernel path.

You could script all the above into one command to make it easier to do on each new kernel upgrade.

Stopping NetworkManager from messing your aircrack-ng up:

This part I fully figured out on the last day of Shmoocon, unfortunately it really messed up my WPA hacking and I didn’t realize it until it was to late to fully recover before the end of the WCTF.  If you don’t do this you will be able to slowly crack WEP, and you’ll see things on WPA, but none of the techniques will work.  It will look like it’s working, but it really isn’t.  NetworkManager (which manages all your network connections) will constantly mess around with your monitor and packet injections even when it looks like it’s not.  Took some digging and testing, but finally found a nice way to get NetworkManager out of the way.

  1. First plug in your new network adapter and find out what interface name and mac address gets assigned. I would suggest running the command once before you plug it in and once after so you know which one is the new interface
    ifconfig
    with output like:
    NNNNNNNN: flags=4163<UP,BROADCAST,RUNNING,MULTICAST> mtu 1500
    inet 192.168.210.132 netmask 255.255.255.0 broadcast 192.168.210.255
    inet6 fe80::c200:dca9:632:dbba prefixlen 64 scopeid 0x20
    ether XX:XX:XX:XX:XX:XX txqueuelen 1000 (Ethernet)
    RX packets 226897 bytes 315230079 (300.6 MiB)
    RX errors 0 dropped 0 overruns 0 frame 0
    TX packets 33918 bytes 4726882 (4.5 MiB)
    TX errors 0 dropped 0 overruns 0 carrier 0 collisions 0

    or
    ip -a link
    with output like:
    2: NNNNNNNN: <BROADCAST,MULTICAST,UP,LOWER_UP> mtu 1500 qdisc mq state UP mode DORMANT group default qlen 1000
    link/ether XX:XX:XX:XX:XX:XX brd ff:ff:ff:ff:ff:ff
  2. Next you will need to open the following file to edit:
    sudo vi /etc/NetworkManager/NetworkManager.conf
  3. You need a section with the following:
    [main]
    plugins=ifupdown,keyfile
  4. Then after that add a section with the following:
    [ifupdown]
    managed=false
  5. Finally have a section with the following where the XXXXs are replaced with the MAC address and NNNNNNN is the interface name found above
    [keyfile]
    unmanaged-devices=mac:XX:XX:XX:XX:XX:XX;interface-name:NNNNNNNN
  6. Now save the file and restart network manager
    systemctl restart NetworkManager
  7. That should now cover you.  You can check by running the following command and confirming it says unmanaged:
    nmcli dev status
    with output like this:
    DEVICE     TYPE      STATE      CONNECTION
    wlp108s0    wifi     connected   wifinet
    lo          loopback unmanaged   --
    NNNNNNNN    wifi     unmanaged   --

Now NetworkManager should stay out of the way and allow you to have fun.

Next: Installing our pen-testing tools

I based the software I installed on the Pentoo Linux security focused distribution.  You could go the route of just installing Pentoo or Kali, and that’s fine, but I wanted a more general purpose setup.  I also wanted to make sure I was familiar with the small details that go into installing, using, and maintaining the software stack.

And those details will be for part 2….but here is a taste

From the base Fedora repo you can install an important tool aircrack-ng to get started.  From the command line run:

sudo dnf install aircrack-ng

When that finished up you can insert your wireless card and run the following command to start listening to what’s broadcasting around you (with NNNNNNNN being replaced by your actual wireless interface you worked on above):

sudo airodump-ng NNNNNNNN

Till next time…

Posted in Linux, Security | Tagged , , , , , , | 1 Comment

Using a ReadyNAS with OS6 as a central syslog server

In the process of building out my network intelligence system I need to have a central location to collect system and event logs on my network.  Since my ReadyNAS has Linux under the hood I figured what better place (since it has plenty of space to store LOTS of logs).  Here is what I did.

First, you need to have a a ReadyNAS with OS6 on it.  In my case I have one of the older ReadyNAS Pro 6 boxes which only officially support the older 4.x OS.  But, there is a very easy way to upgrade to OS6 and it has been very reliable for me.  Down side is that it will require wiping out all data on your NAS and reformatting (Backup, Backup, BACKUP!).  I believe it’s well worth the hassle of backing up and restoring data to get this upgrade.  It will void your warranty (or make it much more difficult to get through tech support), but it appears that Netgear has been reasonably responsive in adding fixes for the unsupported legacy hardware.  Once my NAS was converted updates have been easy and automatic.  Anyways, here is the info I followed to convert:  ReadyNAS Forums

Now to setup syslog (rsyslog) to receive incoming logs on your network do the following:

  1. Log into your NAS and enable SSH
    • Go to System -> Settings -> Service -> SSH
  2. Create a new folder to store/share your logs
    • Go to Shares -> Choose a Volume (or create one)
    • Create a new Folder (call it logs?) and set permissions as you like
  3. Create a new group
    • Go to Accounts -> Groups -> New Group
    • Create a new Group (call it logs?) and set permissions as you like
  4. Go back to your new “logs” share folder and set permissions such that the “logs” group has read/write perms
    (These are very liberal permissions and basic groups/users, you can go much more restrictive, which I would recommend once you’ve got the basics working)
  5. Now ssh to your ReadyNAS as root using the same password as your web based admin account
  6. Install rsyslog
    • apt-get install rsyslog
  7. Configure rsyslog
    • vim.tiny /etc/rsyslog.conf
      If you don’t know vim go read-up first, you need to know how to insert, delete, and save
    • Change the following lines:
      Remove the # signs in front of these lines at the top:

      $ModLoad imudp
      $UDPServerRun 514
      $ModLoad imtcp
      $InputTCPServerRun 514

      Add the # sign to these lines:

      #*.*;auth,authpriv.none -/var/log/syslog
      #cron.* /var/log/cron.log
      #daemon.* -/var/log/daemon.log
      #kern.* -/var/log/kern.log
      #lpr.* -/var/log/lpr.log
      #mail.* -/var/log/mail.log
      #user.* -/var/log/user.log
      #mail.info -/var/log/mail.info
      #mail.warn -/var/log/mail.warn
      #mail.err /var/log/mail.err
      #news.crit /var/log/news/news.crit
      #news.err /var/log/news/news.err
      #news.notice -/var/log/news/news.notice
      #*.=debug;\
      #            auth,authpriv.none;\
      #            news.none;mail.none -/var/log/debug
      #*.=info;*.=notice;*.=warn;\
      #             auth,authpriv.none;\
      #             cron,daemon.none;\
      #             mail,news.none -/var/log/messages

      And add these lines to the bottom:

      $template RemoteLog,"/data/logs/%$YEAR%/%$MONTH%/%fromhost-ip%/syslog.log"
      *.* ?RemoteLog
    • Be sure to change the /data/logs part to match with your volume and folder you created in steps 2 above
  8. Now enable and restart rsyslog
    • systemctl restart rsyslog.service
    • systemctl enable rsyslog.service
  9. Check to make sure rsyslog started happily
    • systemctl status rsyslog.service
    • tailf /data/logs/2015/03/127.0.0.1/syslog.log
      • You should see something like this “rsyslogd: [origin software=”rsyslogd” swVersion=”5.8.11″ x-pid=”24127″ x-info=”http://www.rsyslog.com”] start”
  10. Log out of SSH and disable it if you don’t need it anymore.

That should cover the basics.  By default the ReadyNAS will log as from an IP of 127.0.0.1, all other hosts will log from their IPs on your network.  There is of course a lot more custom configuration you can do.  This is just the basics.  You will also be able to view your logs from the shared volume you created.

I commented out a lot of lines above to avoid duplicate logging in the /var/log directory as that’s only about 4GB in size.  You can always re-enable them and change there path if you choose.


Posted in Linux, Security, Technology | Tagged , | 4 Comments

Updated Network

I’ve been very busy updating my home network infrastructure lately.  I wanted to improve the zone separation, while at the same time providing a reasonably secure connection between my resources at home and my resources on the net.

Some of these changes include:

  • Replacing my SSG-140-SH Firewall with a new SRX220H2 w/POE Firewall.
  • Replacing my DELL 5448 Switch with a new Netgear GS724T Switch.
  • Removing an old 4 port POE switch.
  • Replacing my old VLAN setup (Main, Media, Utils) with my new VLAN setup (Main, Wireless, Media, Utils, LAB, VPN, Tunnel).
  • Upgrading my old Dell 860 (250GB Raid1 and 8GB RAM) co-located server with a new SuperMicro based server that has 12TB of storage and 32GB of ram.  This is split into virtualization images, so I’ll be able to work with Docker/CoreOS/KVM based technologies in my personal cloud.  This is tied into my home network via an OpenSwan -> SRX IPSec tunnel.  Additionally, the SRX will be able to provide dynamic SSL VPN capability for when I’m on the road.

All of the above gets added to my existing 12TB NAS, multiple POE wireless access points, and virtualization server.

I have a few more tweaks left to handle multicasting and cross-LAN traffic on the network, finishing up my log aggregation and analysis tools, as well CoreOS and Docker work for PaaS deployments.  This should provide some nice resources for my security research.

Posted in David, Hobbies, Linux, Security, Technology | Leave a comment

Hardware Hacking: Solar Panels and Battery Chargers

I wanted to find a way to easily charge a couple of AA and AAA batteries from a solar panel for camping, hiking, and geo-caching.  Thought it would be nice to charge via the sun vs carrying around extra batteries charged up from the grid.  Turns out it wasn’t as easy as I had hoped, and yes, the solution involves pulling out the soldering iron, see below.

Finding a solar cell was actually pretty easy, doing some looking around I found this Anker 14W Portable Panel on Amazon:

Anker 14W Solar Panel

Cheap at about $50 and a full 14W with two USB ports.  All I needed to do was find a USB powered AA/AAA charger.

Yeah, sure, no problem…

So, after a LOT of searching turns out about the only good one I could find was the Guide 10 Plus charger by Goal Zero:

Goal Zero Guid 10 Plus Charger

One big draw back, it’s designed to work “best” with their own 7W solar panel, which costs more than the Anker for half the wattage.  They say that it will charge in 3-6 hours using their special connector to their solar panel, or 6-10 hours from a USB port.  It seems they put in a charging limiter on the USB in port (likely lower allowable current) vs the special solar port.

So what to do?  Build my own special solar cable that will allow USB to charge to the solar port on the battery charger instead of the USB port on the battery charger.  Two things to worry about, simulating the proper voltage and current on the solar port and having the right size adapter.  Taking some measurements I found that the solar port seemed to be a pretty standard 2.5mm x 0.7mm dc jack (High Speed USB 2.0 to DC 2.5mm Power Cable for Mp3 Mp4).  To handle the power issues I noticed that the box and literature stated that the solar port input specs were 6.5V at up to 1.1 to 1.3A (depending on which document of Goal Zero you read).  Standard USB is 5V at 2A (standard 2.0), so just needed to convert this to the required solar port specs.  To accomplish this I did some searching and found this:

Pololu Adjustable Boost Regulator - Converter

This boost regular can take in the 5V 2A from USB and using a small screwdriver I was able to adjust the trimmer potentiometer to a measured 6.5V ~1.1A output.  My cable looked like this after my soldering work:

Back of Converter Soldering Converter and USB Plug Front of Converter Soldering

With a little bit of electrical tape to cover up the sensitive parts I had this:

Finished Custom Cable

At this point there was only one thing left, to cross my fingers hook it up and give it a shot (oh and I did run this by an Electrical Engineering friend of mine first to make sure my plans were sound given how long it’s been since my college electrical engineering classes.  He approved and gave me an A- on the soldering job).

And it worked! Not only did it work, with the 14W panel and the regulated 5v 2A from that, I got faster more consistent charging times than the Goal Zero setup.  I know this because, shortly after buying the 14W panel and all my parts to build my own charger an incredible deal came up to buy the Goal Zero 41022 Guide 10 Plus Solar Recharging Kit
which included the 7W panel and another USB/Panel AA/AAA battery charger, plus mine came with the portable Rock Out speakers.  It was a VERY good deal or I wouldn’t have done it.  But it made for some great testing and comparison.

So happy and successful hardware hack!  And now I have two very effective portal solar powered battery charging systems.  The Anker based one for heavy lifting and fast strong charging of USB devices and batteries.  The Goal Zero for flexibility (USB, 12Volt, and Solar Port) and lightness (but slow charger).

The final Results:

Anker Solar Panel, Custom USB Cable, Goal Zero Guide 10 Charger

Posted in David, Gadgets, Lost And Found, Technology | Tagged , | Leave a comment

Why RAID 5 is NOT dead yet

So, recently I started looking to see if there was any nice hardware around to provide a solid enclosure for a Freenas based home made NAS storage system.  In looking into this, I ran across this page: Freenas Raid Overview.  What really caught my eye was the statement “CAUTION: RAID5 “died” back in 2009″ and a link to this article: Why RAID 5 stops working in 2009.   Worried that I had made a fatal error in my existing 12TB (6x2TB) RAID 5 setup, I read on and realized something wasn’t right.  And it got worse; a follow up article in 2013 Has RAID5 stopped working by the same author continued on in error.  “What’s the problem?” you might ask.  Well, it is a failure to understand fundamental math.

See, the author (and, to be fair, lots of people) makes a mistake when looking at probability of separate events added together.  They make the assumption that if you have six separate events each with a given probability of happening, and you put them all together, then as a whole you’ve increased your chance of that event happening.  That’s completely wrong.  Your overall probability is no greater than the individual probabilities.  Each individual event has no effect on the other events.  So since you have six 2TB disks with a max URE failure rate (probability of failure to read) of 1×10^14 you are still only looking at the failure of that 2TB disk, not of the 12TB of storage.  If you really want to try to account for combined events, you can take the chances of having two drives fail with URE at the same time.  This is done by multiplying the events together.  So 1/(1×10^14) times 1/(1×10^14) equals 1/(1×10^28) probability of failure, that is a URE of 1×10^28!  All failures probabilities are completely independent.  And it gets better from there:

1.  With the probability and statistics error stated above, you are only looking at the chance of failure for each individual disk, not the whole storage array.  So you have a 1×10^14 probability of a read failure for a 2TB disk during the recovery of any disk.  Yes, this technically gets worse as drive sizes increase, but you would need to read each individual, COMPLETELY FULL 2TB disk, in whole 6.25 times (for the needed 12.5TB of data) to hit this probability of failure point on that disk.  For a 4TB disk you have to read the entire full disk 3.125 times, so worse odds, but in most setups this still is unlikely to occur during a rebuild (unless you’ve just got bad luck).

2. That 1×10^14 is the MAX unrecoverable read error rate.  That means that you should get no more than that number of failures.  You are actually likely to get less than that number of failures, so can expect to be able to read more data than 12.5 TB before a failure. See, more good news!

3.  When RAID 5 is in recovery mode, you are not reading a full 2 TB of data off your full 2TB disks to rebuild your failed drive.  The parity information to recover the drive is only the total usable storage divided by the number of drives in the array.  For a 2TB x 6 array (12TB of raw storage) you get 10TB of usable storage.  That 10TB is divided by 6 to give you about 1.67 TB of data needed to be read off each individual 2 TB drive to recover the failed drive in the array. So, again, your odds get better.

Yes, the chance of failure does go up as drives get larger (assuming URE doesn’t improve), and, yes, you should ALWAYS have offsite (a different raid box) backup for anything you don’t want to risk losing (good disaster recovery strategy anyways).  But RAID 5 isn’t dead and is still an excellent choice for good performance, reliability, and cost.

And here is my real life example:  I made the mistake of purchasing Seagate “green” 2TB drives for my original 6x2TB NAS box.  These drives have a little bug, they report “failed” even when they haven’t really failed when they are used with some hardware raid solutions.  For 4 months after I installed these drives, I had a drive failure just about every three weeks and had to do a rebuild of 5TB of data (take failed drive out, format it blank, stick it back in, rebuild).  That’s about five RAID 5 rebuilds before I finally gathered the funds to replace all the drives with WD red NAS drives (no failures since).  Oh, and each time I swapped out a red drive for a green drive, another Raid 5 rebuild, so six more rebuilds for a total of eleven.  Guess what, I got lucky and there were no URE events during any of those rebuilds and no data was lost (yes I have off site backup as well).  Of course when I say luck, I mean my odds were pretty good I wouldn’t have a catastrophic failure as the other author claimed I would.  😉

Posted in David, Technology | 8 Comments

IPv6 and WordPress, not for the faint of hearts.

Unfortunately it appears that getting WordPress going in IPv6 is a constant undertaking.  Primary causes?

WordPress domains don’t support IPv6.  And my DNS provider doesn’t fully support IPv6 at their DNS server (I can add AAAA records, but you can’t access the NS via IPv6).

So I end up having to create a few /etc/hosts entries to get plug-in updates and reference urls to work within WordPress.  Additionally, pure IPv6 hosts would never be able to reach my domain because of lack of IPv6 at my DNS provider.

So if you are going this route, be ready to handhold your site for a while.

Posted in Lost And Found | Leave a comment